#49 | 5 Common NetSuite Data Upload Errors & Data Validation

In this tutorial, we will be going over the NetSuite data validation process. In our many years of doing system implementations and consulting, one of the biggest mistakes we see people make is not doing enough data validation.
We will discuss
- 5 common data upload errors
- How to validate uploaded data in NetSuite
- How to validate uploaded data using Excel
I suggest you watch the video. It’s easier to understand if you are a visual/audio learner. The content below is the same as the video. It’s for those who learn by reading.
Let’s assume we are uploading the transactions and detailed activities. These are typically AR transactions, AP transactions and journal entries.


Top 5 Common Errors When Uploading:
#1 : The numbers are not in number format. If a field is using numbers and those numbers have commas, the upload will cause an error. NetSuite doesn’t allow commas in numbers during the uploading process.
#2 : Headers have empty cells. This error occurs because you previously had some data in those cells. You just cleared the content without deleting the whole column or whole row. It will cause an error. NetSuite thinks the empty cells should have data and thinks that the fields aren’t populated properly.
#3 : In Excel, we use internal ID, but in NetSuite we did not map it to the correct internal ID reference. An example of this is if the subsidiary name is sub1 and the internal ID is just #1. So, the common mistake is the user forgot to change the reference names.
#4 : Journal entries don’t balance. If the total journal debits and credits don’t make EXACTLY, the journal entry will not post. This is a common error. Sometimes, the data is exported from the old ERP system contains more than decimal places such as .0987 that may round up to $0.10. In Excel, the debits and credits look like they balance. So, you may have to look in the cells and see which of these journal entries in debits and credits don’t balance or format the cells not to round.
#5 : When you are posting multiple journal entries with different subsidiaries, if the journal entry lines are not grouped together by subsidiaries, it will cause an error.
2 Validation Approaches
After the data has upload, how do we do the data validation? There are 2 ways.

Validate in NetSuite
To view one of the individual transactions that you uploaded in NetSuite, we’ll look at the individual vendor example.
Go to List > Relationships > Vendors
Click on view next to the vendor if you want to view the fields. In this example, we are looking for an individual vendor name, Jimmy Smith. To validate, make sure that all the data fields are in the right fields.
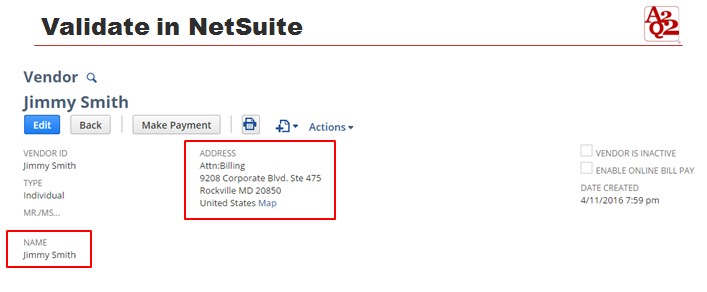
We can see that the name and address are correct. This is an example of how you can validate within NetSuite. And, of course, this is time consuming if you have thousands of records. This will only work when you have a handful of records.
Validate Using Excel
We’ll show you how to do the validation by exporting the data from NetSuite into Excel. Exporting into Excel allows us to quickly validate by using Excel formulas like counting transactions (record count) or summing large numbers (batch totals).
Go to List > Relationships > Vendors
Click on the green Excel icon on the top left. Once you hit the Excel download button, you can now see the excel file.

Click on the Excel file.

This is what the export file looks like. Now, you can see all of the records that you’ve imported. You can look at them at a glance rather than one by one on each individual transaction.
Summary
To recap, in this training, we shared:
- 5 common data upload errors
- How to validate uploaded data in NetSuite
- How to validate uploaded data using Excel

Leave a Reply