#79 | How to Create a Stand-alone Cash Sale and a Cash Sale from Sales Order

Cash sale is one of the popular terms in accounting. Since the creation of a cash sale can be initialized by several sources, it is important to know the correct steps and procedures in creating one and entering it in NetSuite. In this blog, you will learn how to create a standalone cash sale and cash sale from sales order.
In this guide, we will discuss the following:
- Overview
- Creating Cash Sales
- Entering A Cash Sale per Subtab
- Creating Cash Sales from Sales Order
- Printing Sales Receipt
I suggest you watch the video. It’s easier to understand if you are a visual/audio learner. The content below is the same as the video. It’s for those who learn by reading.
Overview
Before getting in to specific procedures, here are the basics of what a cash sale and its components are.
- It records the sale of goods or services for which immediate payment is received at the time of delivery.
- Cash sale line items specify the goods and services sold and their sales amounts.
- The sum of all sales amounts plus any applicable tax equals the total amount for the transaction.
You can initialize a cash sale from any of the following:
- Customer
- Estimate/Quote
- Opportunity
- Sales Order
Creating Cash Sales
- Step 1: Go to Transactions → Sales → Enter Cash Sales.

Step 1 – Transaction going to sales then select enter cash sales

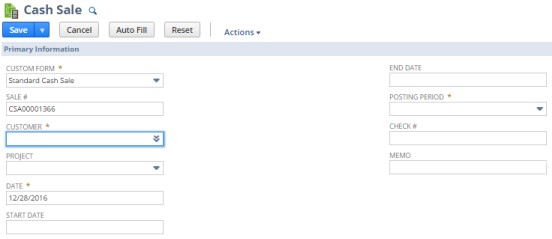
- Step 2: Under Primary Information, enter the details or select an option in the following fields:
Step 2 – Primary Information in Cash Sales - Custom Form
- Sale Number
- Customer
- Project
- Date
- Start Date and End Date – If you use the Advanced Billing feature, enter the date for the first bill to be created on the start date.
- Posting Period
- Check Number
- Memo – When you use the Search Transactions feature, you can search for specific words and phrases in this field.
- Step 3: Under Sales Information, the following fields will be filled:
Step 3 – Sales Rep and Partner Field should be filed up information needed - Sales Rep – The sales rep or sales group associated with the customer on this transaction is chosen by default.
- Partner – The partner associated with this customer appears in this field.

Note that you can also choose a different partner for this opportunity. If you have enabled the Multi-Partner Management feature, you can associate partners with this transaction on the Partners subtab.
Associate sales reps with this transaction in one of the following ways:
- If you do not use the Team Selling feature, select the sales rep or sales group in the Sales Rep field.
- If you use the Team Selling feature, click the Sales Team subtab. Select the sales team for this transaction.
The partner associated with this customer appears in the Partner field. The sales rep or sales group associated with the customer on this transaction is chosen by default.
- Step 4: Under Classification, enter the details on the following fields:
Step 4 – Under classification, the Department, Class, and Location field should be filed with information needed. - Department
- Class
- Location

Same with step 3, you can choose a different partner for this opportunity by going to the Partners subtab. Just make sure that the Multi-Partner Management feature is enabled.
You can also associate sales reps with this transaction in the same way as in step 3.
Entering a Cash Sale per Subtab
Steps in Adding Items
The page for entering a cash sale has several subtabs. The subtabs that are displayed on the page are determined by the setting and options you have enabled.
Most line item columns in the Items subtab are optional. In the Items subtab, you can also apply a promotion to all items in the sales order.
- Step 1: Click the Items subtab in the form. Then click the Add Multiple button to quickly add several items to this transaction.

The Choose Item window opens and shows a list of items you can add. You can filter the list by item type or search for all or part of a name.

- When you click an item in the left pane, it is added to the right pane, where you can enter a quantity for the item.
- Click Done for the items and quantities shown in the right pane to be added to the transaction.
Note that if you use the Multiple Shipping Routes feature, you can check the Enable Item Line Shipping box to enter multiple shipping addresses and shipping methods on a sales order.
- Step 2: In the Quantity column, enter the quantity for this item.

- Step 3: In the Serial/Lot Numbers field, enter the serial or lot number of the item.

Click on the encircled icon and the window on the right will enable to enter the serial or lot number.
- Separate each serial number with a space, a comma, or by pressing Enter after each one.
- You must enter a serial number for each serialized item.
- If you enter a quantity of 2, then you must enter two serial numbers. Lot numbers must be entered in this format: LOT#(Quantity)
- To enter a quantity of 100 items as Lot number ABC1234, enter ABC1234(100).
- Step 4: If you use multiple prices, in the Price Level column, choose a price level for this item.
- Step 5: The tax code and tax rate for this item is shown in the following columns as show in below image.
- Step 6: Check the Exclude Item from Rate Request box if you want to exclude the item when calculating shipping. The shipping rate total will not include this item.

Note that this box is available only for inventory and assembly items.
- Step 7: Click Add or press Enter to add the item to the order.
Steps in Applying a Promotion
- Step 1: Enter the promotion’s coupon code or select an option in the Discount ItemYou can only do one of the following:
- If the promotion uses a single-use coupon code, enter the promotion’s coupon code in the Coupon Code field.
- If a transaction discount applies to this order, select it in the Discount Item field. In the Rate field, enter any other discounts you want applied to this order.
- Rate field – Enter a negative amount or percentage to have the discount subtracted from your total.

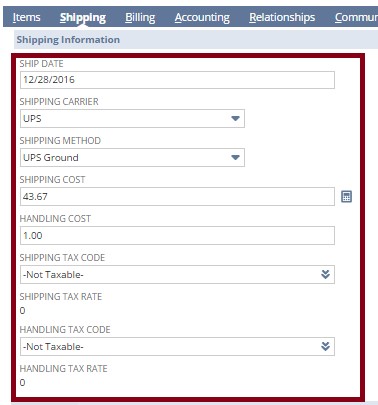
Steps in Entering Shipping Information
- Step 1: Click on the Shipping subtab to enter all necessary information relating to the shipment of goods.
Shipping Information Form - Ship Date field – Enter the date you expect this item to be shipped from the vendor.
- Ship to Select – Click the edit icon next to the dropdown list to edit the default shipping address.
Steps in Adding Billing Information
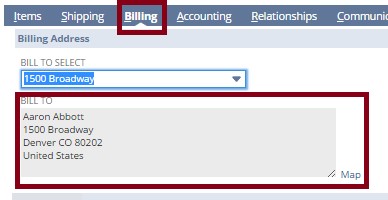
- Step 1: Click on the Billing subtab and fill in the following details:
- Bill to Select & Bill To – The customer’s default billing address will show in the text field.
- Select New in Bill To Select field, or click the + icon, to add an address to be used for this sales order and saved with the customer record.
Step 1 – Click billing subtab on the menu and enter information on bill to select field and bill to field - Step 2: Under the Payment section, below are the relevant fields to be completed.

Steps in Entering Account Information
- Step 1: Click on the Accounting subtab and enter the following details:

- Step 2: Select Funds if you receive payment by cash or check.After the money is deposited, go to Transactions à Make Deposits to record your deposit.
- Step 3: Select Account if you receive payment by credit card and choose which account it will be credited.
- Step 4: In the Currency field, select the currency you want to use for this transaction. The customer’s primary currency is selected by default.
Steps in Entering Communication Information
- Step 1: Click the Communication
- Step 2: Fill out the details as seen below to create and send messages to your customers.
You can also create tasks, events, and phone calls and associate them with a transaction.

- Step 3: Click Save when you’re done.After you saving the transaction, this information is combined in the Activities subtab, so you can track meetings and conference calls you schedule in the process of finalizing a sale.
Creating Cash Sales from Sales Orders
A sales order expresses a commitment to ship goods and or perform services. It has no accounting impact until items are shipped and a cash sale is created from the sales order to bill the customer for the items.
There are two ways to do this procedure, and the steps will depend whether the advanced shipping feature is enabled or not.
Remember that when creating a cash sale for the sales order, it depends on the sales order form you originally used to enter the order. The cash sale form generates a cash sale.
Steps in Creating Cash Sales from Sales Order (Using Advanced Shipping)
Before anything else, make sure that the Sales Order is fulfilled first or in Pending Billing status for it to be processed.
Step 1: Go to Transactions → Sales → Invoice Sales Orders.
Step 2: On the Invoice Sales Orders page, select the customer you want to create a cash sale for.
Step 3: Under the Orders section is the Invoice column. Tick the box next to the sales order you want to create a cash sale for.
Step 4: Click Submit.

Step 5: Click Refresh button to complete the process.
The submission status should now change to Complete as seen below.

Steps in Creating Cash Sales from Sales Order (Without Advanced Shipping)
Step 1: Navigate to Transactions → Sales → Enter Sales orders → List.
Step 2: Click View link next to the Sales Order to bill.
Step 3: Click Fulfill button.
Step 4: On the Item Fulfill Fulfillment page, click Save.
Step 5: Once the Item Fulfillment is saved, click Bill button.
Step 6: On the Cash Sale form, make any changes you need to the cash sale.
Step 7: Click Save.

Printing Sales Receipt
Steps in Printing Single Sales Receipt
- Step 1: Go to Transactions → Sales → Enter Cash Sales.
- Step 2: On the Cash Sale page, complete the information as appropriate.
- Step 3: Click Save & Print.
- Step 4: Click the printer button in the Adobe application frame.
Steps in Printing Multiple Sales Receipt
- Step 1: Go to the Transactions → Sales → Enter Cash Sales → List.
- Step 2. On the Cash Sales page, click Print next to the numerous receipts you want to print.
- Step 3: Check the To Be Printed box on each transaction you enter under Communication tab > Messages sub tab.
- Step 4: Navigate to Transactions > Management > Print Checks & Forms.
- Step 5: Click Sales Receipts.
- Step 6: On the Print Sales Receipts page, mark the Print checkbox next to the cash sale to be printed and click Print button. NetSuite opens the printout for your receipt in an Adobe application document.
Summary
You just learned the step by step process of creating a sales invoice. To quickly go back to the main sections of this tutorial, click on the links below.
- Overview
- Creating Cash Sales
- Entering A Cash Sale per Subtab
- Creating Cash Sales from Sales Order
- Printing Sales Receipt

Leave a Reply